LDAP Authentication
Specify this authentication method when using the LDAP server to authenticate users who have their accounts on the LDAP server. Users cannot be authenticated if they do not have their accounts on the LDAP server. The Address Book stored in the LDAP server can be registered to the machine, enabling user authentication without first using the machine to register individual settings in the Address Book. When using LDAP authentication, to prevent the password information from being sent over the network unencrypted, it is recommended to encrypt communication between the machine and LDAP server by using SSL. You can specify on the LDAP server whether or not to enable SSL. To do this, you must create a server certificate for the LDAP server. For details about creating a server certificate, see Creating the Server Certificate. SSL settings can be specified in the LDAP server setting.
Using Web Image Monitor controlled from networked computers, you can enable a function to check that the SSL server is trusted. (Web Image Monitor is a management tool installed on this machine to monitor this machine or configure settings for this machine by using a web browser.) For details about specifying LDAP authentication using Web Image Monitor, see Web Image Monitor Help.
When you select Cleartext authentication, LDAP Simplified authentication is enabled. Simplified authentication can be performed with a user attribute (such as cn, or uid), instead of the DN.
To enable Kerberos for LDAP authentication, a realm must be registered in advance. A realm must be configured in capital letters. For details about registering a realm, see "Programming the Realm", Settings.
![]()
If you use LDAP authentication, user information registered in the LDAP server, such as the user's e-mail address, is automatically registered in the machine's address book. Even if the user information automatically registered in the machine's address book is edited on the machine, it is overwritten by the information from the LDAP server when authentication is performed.
Under LDAP authentication, you cannot specify access limits for groups registered in the directory server.
Do not use double-byte Japanese, Traditional Chinese, Simplified Chinese, or Hangul characters when entering the login user name or password. If you use double-byte characters, you cannot authenticate using Web Image Monitor.
If Active Directory in LDAP authentication is used when Kerberos authentication and SSL are set at the same time, e-mail address cannot be obtained.
Under LDAP authentication, if "Anonymous Authentication" in the LDAP server's settings is not set to Prohibit, users who do not have an LDAP server account might be able to access the server.
If the LDAP server is configured using Windows Active Directory, "Anonymous Authentication" might be available. If Windows authentication is available, we recommend you use it.
Operational requirements for LDAP authentication
To specify LDAP authentication, the following requirements must be met:
Configure the network so that the machine can detect the LDAP server.
When SSL is being used, TLSv1 or SSLv3 can run on the LDAP server.
Register the LDAP server to the machine.
To register the LDAP server, specify the following settings:
Server Name
Search Base
Port Number
SSL communication
Authentication
Select either Kerberos, DIGEST, or Cleartext authentication.
User Name
You do not have to enter the user name if the LDAP Server supports "Anonymous Authentication".
Password
You do not need to enter the password if the LDAP Server supports "Anonymous Authentication".
For details about registering an LDAP server, see "Programming the LDAP Server", Settings.
![]()
For the characters that can be used for login user names and passwords, see Usable characters for user names and passwords.
In LDAP simple authentication mode, authentication will fail if the password is left blank. To use blank passwords, contact your service representative.
The first time an unregistered user accesses the machine after LDAP authentication has been specified, the user is registered in the machine and can use the functions available under "Available Functions" during LDAP authentication. To limit available functions for each user, register each user and corresponding "Available Functions" setting in the Address Book, or specify "Available Functions" for each registered user. The "Available Functions" setting is enabled when the user accesses the machine.
Data transmission between the machine and the KDC server is encrypted if Kerberos authentication is enabled. For details about specifying encrypted transmission, see Kerberos Authentication Encryption Setting.
Before configuring the machine, make sure that administrator authentication is properly configured under "Administrator Authentication Management".
![]() Log in as the machine administrator from the control panel.
Log in as the machine administrator from the control panel.
For details on how to log in, see Administrator Login Method.
![]() Press [System Settings].
Press [System Settings].
![]() Press [Administrator Tools].
Press [Administrator Tools].
![]() Press [
Press [![]() Next].
Next].
![]() Press [User Authentication Management].
Press [User Authentication Management].
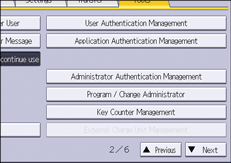
![]() Select [LDAP Auth.].
Select [LDAP Auth.].
If you do not want to enable user authentication, select [Off].
![]() Select the LDAP server to be used for LDAP authentication.
Select the LDAP server to be used for LDAP authentication.
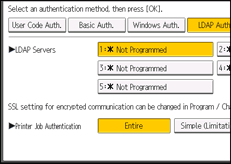
![]() Select the "Printer Job Authentication" level.
Select the "Printer Job Authentication" level.
For a description of the printer job authentication levels, see Printer Job Authentication.
If you select [Entire] or [Simple (All)], proceed to Step 12.
If you select [Simple (Limitation)], proceed to Step 9.
![]() Press [Change] for "Limitation Range".
Press [Change] for "Limitation Range".
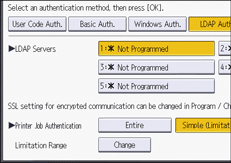
![]() Specify the range in which [Simple (Limitation)] is applied to "Printer Job Authentication".
Specify the range in which [Simple (Limitation)] is applied to "Printer Job Authentication".
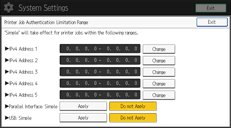
You can specify the IPv4 address range to which this setting is applied. Also, you can specify whether or not to apply the setting to the parallel and USB interfaces.
![]() Press [Exit].
Press [Exit].
![]() Press [
Press [![]() Next].
Next].
![]() In “Available Functions”, select which of the machine's functions you want to permit.
In “Available Functions”, select which of the machine's functions you want to permit.
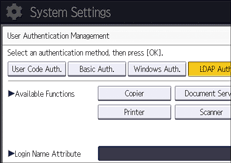
LDAP authentication will be applied to the selected functions.
Users can use the selected functions only.
For details about specifying available functions for individuals or groups, see Limiting Available Functions.
![]() Press [Change] for “Login Name Attribute”.
Press [Change] for “Login Name Attribute”.
![]() Enter the login name attribute, and then press [OK].
Enter the login name attribute, and then press [OK].
Use the login name attribute as a search criterion to obtain information about an authenticated user. You can create a search filter based on the login name attribute, select a user, and then retrieve the user information from the LDAP server so it is transferred to the machine's Address Book.
To specify multiple login attributes, place a comma (,) between them. The search will return hits for either or both attributes.
Also, if you place an equals sign (=) between two login attributes (for example: cn=abcde, uid=xyz), the search will return only hits that match the attributes. This search function can also be applied when Cleartext authentication is specified.
When authenticating using the DN format, login attributes do not need to be registered.
The method for selecting the user name depends on the server environment. Check the server environment and enter the user name accordingly.
![]() Press [Change] for “Unique Attribute”.
Press [Change] for “Unique Attribute”.
![]() Enter the unique attribute and then press [OK].
Enter the unique attribute and then press [OK].
Specify unique attribute on the machine to match the user information in the LDAP server with that in the machine. By doing this, if the unique attribute of a user registered in the LDAP server matches that of a user registered in the machine, the two instances are treated as referring to the same user.
You can enter an attribute such as "serialNumber" or "uid". Additionally, you can enter "cn" or "employeeNumber", provided it is unique. If you do not specify the unique attribute, an account with the same user information but with a different login user name will be created in the machine.
![]() Press [OK].
Press [OK].
![]() Log out.
Log out.
For details about logging out, see Administrator Logout Method.
