Using the Print/Scan(Memory Storage Device) Function
![]()
- Keep SD cards and USB flash memory devices out of reach of children. If a child accidentally swallows an SD card or USB flash memory device, consult a doctor immediately.
The Print/Scan(Memory Storage Device) function allows you to read and print files that are stored on a memory storage device such as an SD card or USB flash memory device. Also, you can save the scanned data on a memory storage device.
The files in the following formats can be printed using the Print/Scan(Memory Storage Device) function: JPEG, TIFF, PDF, and XPS. The scanned data can be saved in JPEG, TIFF, or PDF format.
Printing a file in a memory storage device
![]() Press [Home] (
Press [Home] ( ) at the bottom of the screen in the center.
![]() Press the [Print/Scan(Memory Storage Device)] icon.
Press the [Print/Scan(Memory Storage Device)] icon.
![]() Press [Print from Storage Device].
Press [Print from Storage Device].
![]() Insert a memory storage device in the media slot.
Insert a memory storage device in the media slot.
For details about how to insert a memory storage device, see "Inserting/Removing an SD Card" or "Inserting/Removing USB Flash Memory Device", For First-time Users.
![]() Press [USB] or [SD Card], depending on the type of the storage device.
Press [USB] or [SD Card], depending on the type of the storage device.
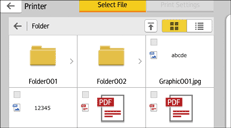
![]() Select the document to print.
Select the document to print.

You can perform the following operations on the selected document:
Preview
Shows the preview image of the first page of the document.
Selected
Displays the list of the selected documents.
![]() If necessary, press [Print Settings] to change the settings such as the number of copies or duplex printing.
If necessary, press [Print Settings] to change the settings such as the number of copies or duplex printing.
![]() Press [Start].
Press [Start].
Saving the scanned data in a memory storage device
![]() Press [Home] (
Press [Home] ( ) at the bottom of the screen in the center.
![]() Press the [Print/Scan(Memory Storage Device)] icon.
Press the [Print/Scan(Memory Storage Device)] icon.
![]() Press [Scan to Storage Device].
Press [Scan to Storage Device].
![]() Insert a memory storage device in the media slot.
Insert a memory storage device in the media slot.
For details about how to insert a memory storage device, see "Inserting/Removing an SD Card" or "Inserting/Removing USB Flash Memory Device", For First-time Users.
![]() Press [USB] or [SD Card], depending on the type of the storage device that you are using.
Press [USB] or [SD Card], depending on the type of the storage device that you are using.
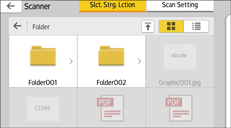
![]() Specify the location to save the scanned data.
Specify the location to save the scanned data.

![]() Place the original.
Place the original.
![]() If necessary, press [Scan Setting] to change the settings such as the file type or scan resolution.
If necessary, press [Scan Setting] to change the settings such as the file type or scan resolution.
![]() To see the scanned image before saving it to a file, press [Preview].
To see the scanned image before saving it to a file, press [Preview].
![]() Press [Start].
Press [Start].
![]() Press [Finish Scan] after scanning of the original has been completed.
Press [Finish Scan] after scanning of the original has been completed.
If there are more originals to be scanned, place the next original, and then press [Scan Next Original].
![]() When the preview screen appears, check the scanned image, and then press [Save].
When the preview screen appears, check the scanned image, and then press [Save].
![]()
If the file name is not specified in [Scan Setting], the scanned image is saved under the name that conforms to the following naming rules:
For single page format:
Transmission date and time (YYYYMMDDHHMMSSMMM) + 4 digit serial page number (_nnnn) + extension (.tif/.jpg/.pdf)
For example, when you send 10-page original in jpeg format at 15:30:15.5 on Dec. 31, 2020, the file names are from "20201231153015500_0001.jpg" to "20201231153015500_0010.jpg".
For multi page format:
Transmission date and time (YYYYMMDDHHMMSSMMM) + extension (.tif/.jpg/.pdf)
For example, when you send 10-page original in PDF format at 15:30:15.5 on Dec. 31, 2020, the file name is "20201231153015500.pdf".
When you save scanned data to a memory storage device, use characters which correspond to the ASCII codes for the file name. If you use characters which is not correspond to the ASCII codes, the machine may not read or save the documents.
Certain types of USB flash memory device and SD cards cannot be used.
