Checking Whether Bidirectional Communication Is Enabled or Disabled
![]() Display the "Devices and Printers" screen.
Display the "Devices and Printers" screen.
Windows 10 (version 1703 or later)
On the [Start] menu, click [Windows System]
 [Control Panel].
Click [View devices and printers].
Windows 10 (before version 1703), Windows Server 2016
Right-click [Start], and then click [Control Panel].
Click [View devices and printers].
Windows 8.1, Windows Server 2012/2012 R2
On the Charm Bar, click [Settings]
 [Control Panel].
Click [View devices and printers].
Windows 7, Windows Server 2012/2008 R2
On the [Start] menu, click [Devices and Printers].
Windows Server 2008
On the [Start] menu, click [Control Panel].
Select [Printer] on [Hardware and Sound].
![]() Right-click the machine, and then click [Printer Properties].
Right-click the machine, and then click [Printer Properties].
For Windows Server 2008, right-click the machine, and then click [Properties].
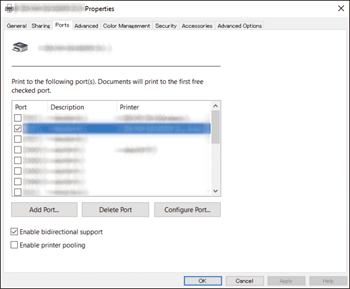
![]() Confirm the setting of bidirectional communication on the [Ports] tab.
Confirm the setting of bidirectional communication on the [Ports] tab.

When using the machine connected to the network
Check that the [Standard TCP/IP Port] or [Standard TCP/IP] check box is selected.
If the TCP/IP port is not displayed as the item to select, add it using the following procedure.
When You Cannot Print a Document even if the Printer Driver is Installed
Check that the WSD port is selected.
Check that the [Enable printer pooling] check box is cleared.
When using the machine connected via USB connection
Check that the [Enable bidirectional support] check box is selected.
When using the machine connected via parallel connection
Check that the [Enable bidirectional support] check box is selected.
![]() On the [Accessories] tab, confirm that the options are detected correctly.
On the [Accessories] tab, confirm that the options are detected correctly.
If the [Automatically Update Printer Information] check box on the [Accessories] tab is not selected, click [Update Now]. If this updates the option settings, bidirectional communication is enabled.
