Importing the Address Book of the Machine
Use "MFP Address Book Downloader" and "Address Book" in "LAN-Fax Generic Utilities" to import the address book registered to the machine into the "Address list" of the LAN-Fax driver.
Install the device certificate before using "MFP Address Book Downloader".
For details, see "Encrypting Network Communication", User Guide.
![]()
To import destinations from the machine directly without editing, perform the procedure "Importing destinations into the LAN-Fax driver".
To save the CSV file and convert it to an RFA file
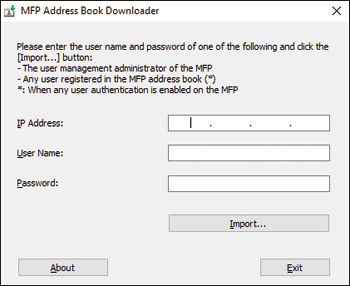
![]() On the application menu of the computer, click [MFP Address Book Downloader] on [LAN-Fax Generic Utilities].
On the application menu of the computer, click [MFP Address Book Downloader] on [LAN-Fax Generic Utilities].

![]() Specify the IP address of the machine and login information, and then click [Import].
Specify the IP address of the machine and login information, and then click [Import].
![]() Enter the file name, specify the location to save the file, and then click [Save].
Enter the file name, specify the location to save the file, and then click [Save].
The CSV file is saved.
![]() Click [Finish] to quit [MFP Address Book Downloader].
Click [Finish] to quit [MFP Address Book Downloader].
Convert the CSV file to an RFA file using [Address Book].
![]() On the application menu of the computer, click [Address Book] on [LAN-Fax Generic Utilities].
On the application menu of the computer, click [Address Book] on [LAN-Fax Generic Utilities].
![]() On the "Address Book" screen, click [Import].
On the "Address Book" screen, click [Import].
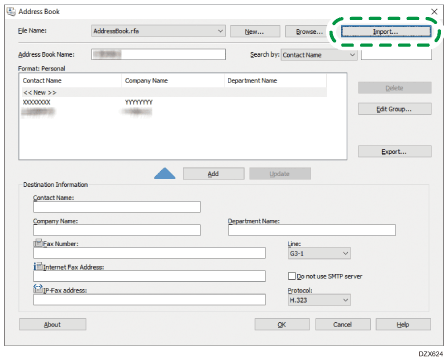
![]() Select the saved CSV file in "MFP Address Book Downloader", select the RFA CSV file (*.csv) in the file format list, and then click [Open].
Select the saved CSV file in "MFP Address Book Downloader", select the RFA CSV file (*.csv) in the file format list, and then click [Open].
![]() Confirm the location to save the file, enter the file name, and then click [Save].
Confirm the location to save the file, enter the file name, and then click [Save].
The RFA file is saved.
If "Do you want to use the device address preferentially?" is displayed, click [No].
![]() On the "Address Book" screen, enter the address list name, and then click [OK]
On the "Address Book" screen, enter the address list name, and then click [OK]![]() [Yes].
[Yes].
The MFP address book import tool ends.
The "Address list name" is displayed in the address book list of the LAN-Fax driver.
Importing destinations into the LAN-Fax driver
![]() Display the "Devices and Printers" screen.
Display the "Devices and Printers" screen.
Windows 10 (version 1703 or later)
On the [Start] menu, click [Windows System]
 [Control Panel].
Click [View devices and printers].
Windows 10 (before version 1703), Windows Server 2016
Right-click [Start], and then click [Control Panel].
Click [View devices and printers].
Windows 8.1, Windows Server 2012/2012 R2
On the Charm Bar, click [Settings]
[Control Panel].Click [View devices and printers].
Windows 7, Windows Server 2012/2008 R2
On the [Start] menu, click [Devices and Printers].
Windows Server 2008
On the [Start] menu, click [Control Panel].
Select [Printer] on [Hardware and Sound].
![]() Right-click the LAN-FAX icon, and then click [Printer Properties].
Right-click the LAN-FAX icon, and then click [Printer Properties].
![]() Click [Print Test Page].
Click [Print Test Page].
The "Fax Settings" screen is displayed.
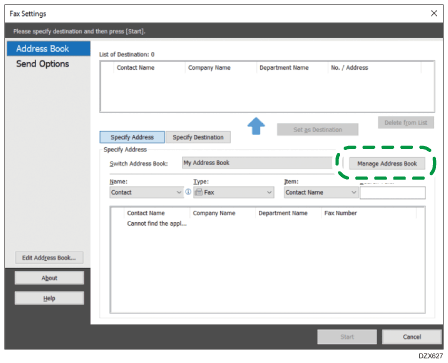
![]() Click [Manage Address Book].
Click [Manage Address Book].
![]() Specify the location to import the address book information.
Specify the location to import the address book information.
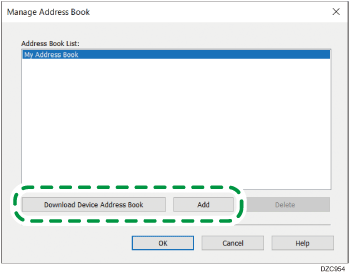
Download Device Address Book: Imports the destinations from the address book on the machine directly. Enter the user name and password of the machine, and then click [Import]. After completing the importing process, click [Finish].
Add: Imports the destinations from the RFA file. Select a file format and the file to import, and then click [Open].
![]() Click [OK].
Click [OK].
![]() Select the imported address book on "Switch Address Book" to check that the imported destinations are displayed.
Select the imported address book on "Switch Address Book" to check that the imported destinations are displayed.
![]() Click [Cancel] to close the setting screen.
Click [Cancel] to close the setting screen.