Specifying the File Type or File Name When Scanning a Document
Specify the settings in [Send Settings] on the scanner screen.
 Press [Scanner] on the Home screen.
If the icon is not displayed on the Home screen, add the icon from the Application list screen.
Adding a Frequently Used Application or Widget to the Home Screen
 Place the original on the scanner.
 Press [Send Settings] on the scanner screen.

 Press [File Type], and select the file type to save the scanned document.
Press [Others] to display the detailed settings screen.
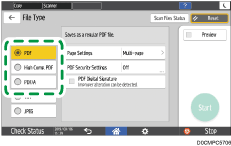
File Type | Description |
|---|---|
Creates a standard PDF file. | |
High Compression PDF | You can reduce the data size without affecting text legibility. |
PDF/A | This is an international standard suitable for long-term data storage. |
TIFF | This image file format is suitable for black-and-white text and lines. |
JPEG | This image file format is suitable for photos and images with subtle gradations. |
You can select from the following file types:
Single Page: PDF, High Compression PDF, PDF/A, TIFF, JPEG
If you select a single-page file type when scanning multiple originals, one file is created for each single page and the number of files sent is the same as the number of pages scanned.
Multi-page: PDF, High Compression PDF, PDF/A, TIFF
If you select a multi-page file type when scan multiple originals, scanned pages are combined and sent as a single file.
Notes about and limitations of file types
"Notes about and limitations of file types", Scan (Classic)
 To specify the file name, press [File Name] and enter the file name.
The file name is generated by combining the following three items:
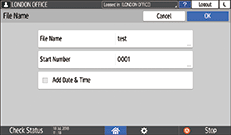
File Name: Enter the string to use at the beginning of the file name.
Start Number: Specify the starting number of a serial number that will be appended at the end of each file name when specifying a file format comprising a single page per file.
Add Date & Time: Select this check box to add the "year, month, day, hour, and minute" the scanning is performed at the end of the file name.
 Specify the scan settings according to the purpose of the scanned data.
 Specify the destination to send the scanned document and then press [Start].

You can also embed the security and digital signature settings, and text information in the PDF file.
Scanning an Original as a PDF with Security Settings Specified
You can change the number of digits in [Scanner Settings]
 [Sending Settings][File Name][Number of Digits for Single Page Files].
The version of the created PDF files is 1.4/1.5.