Changing Tray Paper Settings
If the specified size differs from the actual size of the paper loaded in the paper tray, a misfeed might occur because the correct paper size is not detected.

If the specified paper type differs from the actual type of paper that is loaded in the paper tray, the paper might misfeed, the toner might not fuse properly, or the print quality might be reduced.
Specifying a Custom Paper
 Press [Tray Paper Settings] on the Home screen.

 Select the number of the tray whose paper settings you want to specify.
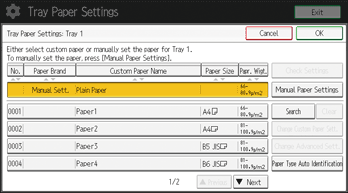
 Select the custom paper that you want to use, and then press [OK].

The custom papers that can be used in the selected tray appear.
Press [![]() Previous] or [
Previous] or [![]() Next] to scroll through the list to find a paper that you want to select.
Next] to scroll through the list to find a paper that you want to select.
After selecting a custom paper, you can check its type and color by pressing Check Settings.
 Press [Cover/Designation/Slip/Separation Sheet] tab.
 Change the settings for the copy function (such as front cover sheet and designation sheet), if necessary.
 Press [Home] (
 ) to close the [Tray Paper Settings] screen.

If you want to change the custom paper settings, press [Change Custom Paper Sett.] in Step 3.
Manually Specifying a Paper's Size and Type
 Press [Tray Paper Settings] on the Home screen.

 Select the number of the tray whose paper settings you want to specify.
 Select the paper whose product name is displayed [Manual Sett.].
 Press [Manual Paper Settings].
 Change the paper settings (such as paper type and size), and then press [OK] twice.
 Press [Cover/Designation/Slip/Separation Sheet] tab.
 Change the settings for the copy function (such as front cover sheet and designation sheet), if necessary.
 Press [Home] (
 ) to close the [Tray Paper Settings] screen.

When you specify Transparency as the paper type, settings for paper thickness are not needed.
Feed Speed Auto Adjustment
If the paper feed roller's rotating speed is irregular, it may cause image defects, such as image distortion and streaks.
To prevent this, you can automatically adjust the paper feed roller's rotating speed. For Auto Adjustment, the specified number of sheets are printed to calculate the adjustment value.
Perform the adjustment for each paper tray.
 Press [Tray Paper Settings] on the Home screen.

 Press [Feed Speed Auto Adjustment].
 Select the paper tray to apply the adjustment.
 Press [Quick Auto Adjustment] or [Auto Adjustment].
For adjustment with the minimum number of sheets to print, select [Quick Auto Adjustment] whereby 30 sheets are printed.
For adjustment with more precision, select [Auto Adjustment] whereby 150 sheets are printed.
 Follow the displayed instruction to load A3 or larger (with the horizontal length of 420 mm or more) regular-sized paper in the paper tray.
 Press [OK].
Printing starts. After the printing is completed and Auto Adjustment is successful, the message reporting it appears.
 Press [Exit].
 Press [Home] (
 ) to close the [Tray Paper Settings] screen.
